This article provides instructions on how to use the Grade Book feature in BestNotes to manage assignments, record attendance, and enter grades for students.
Permissions Required
- Grade Book
Visual Tutorial
Managing the Grade Book
Navigating to the Grade Book
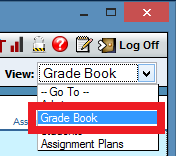
- To navigate to the Grade Book, drop down the box labeled View and select Grade Book.
Term Colors
In the Grade Book, each Term will have its own background color display for each day of the week. The colors are as follows:
- Term 1: Light Blue
- Term 2: Light Cyan/Aqua
- Term 3: Light Green
- Term 4: Light Yellow
- Term 5: Light Orange/Peach
- Term 6: Light Purple/Lavender
Assignments Overview
To manipulate assignments from the Grade Book view, click on the Assign link just below any of the dates across the top of the page.
Issuing Assignments
- Click on the Assign link below the day the assignment should appear. Previously created assignment plans will be visible on the left side of the screen.

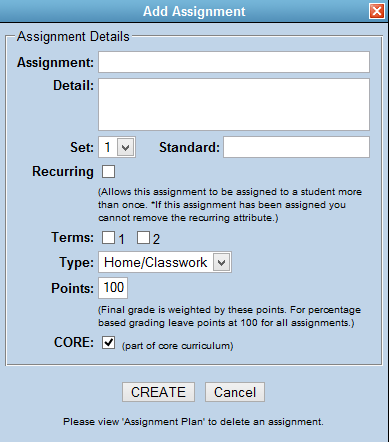
- To begin creating a new assignment, click on the Create Assignment button at the bottom left-hand side of the screen.
- Assignment — The name of the assignment.
- Detail — Additional details or a description of the assignment.
- Set — A dropdown to group the assignment into a numbered set for organizational purposes.
- Standard — An optional text field to specify which curriculum standard the assignment addresses.
- Recurring — When checked, allows the assignment to be assigned to a student more than once. Note: once an assignment has been assigned, the recurring attribute cannot be removed.
- Terms — Select which term(s) the assignment applies to.
- Type — The assignment category (e.g., Home/Classwork).
- Points — The point value of the assignment. Final grades are weighted by these points. For percentage-based grading, leave points at 100 for all assignments.
- CORE — When checked, marks the assignment as part of the core curriculum.
To issue an assignment, choose one of the following methods:
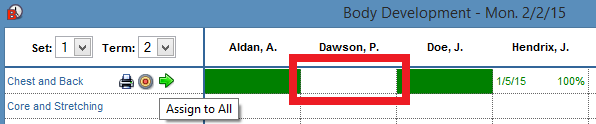
- Hover over the assignment and click the green arrow icon. This will issue the assignment for all students enrolled in the class.
OR - Click on the box under each student's name (it turns Green).
Editing Assignments
To edit an assignment, click on the assignment.
Unassigning Assignments
- To unassign an assignment from a student *before saving*, click on the area that corresponds to the student and assignment (it turns white), then click Save.
- If the assignment has been saved and needs to be canceled and removed from the student's grades:
- Ensure there is no grade for this assignment.
- Re-open the assignment window.
- Click on the area that corresponds to the student and assignment until it turns red.

- Click Save.
The assignment will still display in the Grade Book until the week is refreshed (e.g., click on the green arrows in the upper-right).
Grading Assignments
There are three ways to grade an assignment:
- Click on the red target icon that appears when hovering the cursor over the assignment, then enter the grades.

- Click on the "Grade" link under the date the assignment was assigned, select the assignment, and then enter the grades.

- Click on the block under the correct date and for the desired student in the calendar, then enter the grades.


After entering the grades, you have the option to post these grades to the student's activity log by checking the log box.
Attendance
- To take attendance, click on the Attend link under the date that attendance is being taken.

- In the next window, four options for marking attendance will be available:
- P = Present
- T = Tardy
- A = Absent
- E = Excused
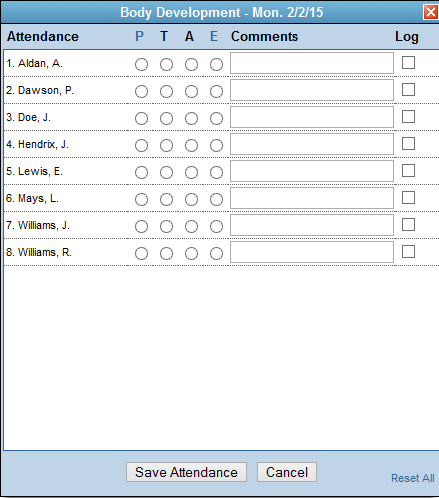
An area to write down comments is available (e.g., second absence). You also have the option to post the day's attendance and comments to the student's activity log.
Editing Section Settings
- Choose the section needed for editing from the section drop-down box.

- Click on the grade book icon in the upper left-hand corner.
From this area, you can edit the weights given to the different types of class work and change the credit value for this section.
Note: Whenever changes are made here that need to be applied to all students, be sure to check the "Apply Defaults to All" checkbox, otherwise these changes will not be applied to any students.
Editing Student Section Settings
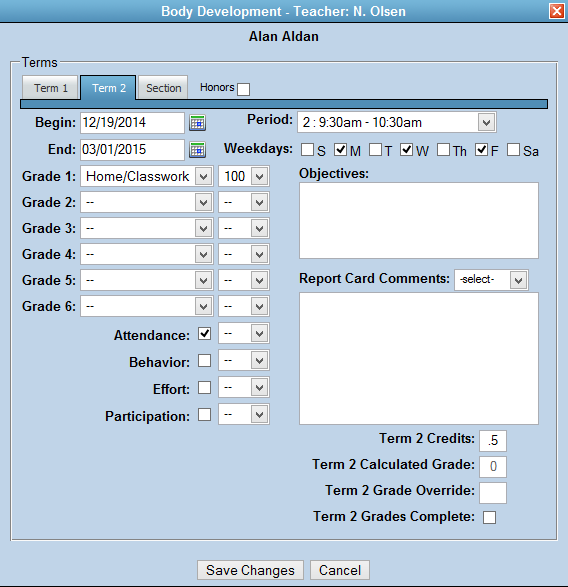
- Click on a student's name.
- From this area, you can edit:
- When the student attends class
- The start and end dates
- The class work weights
- Extra credit (in the TermOverride)
- Enter objectives
- Report card comments
- This is also the area to mark the term grading complete.
Viewing Student Assignment Summary
- Hover over the student's name.
- Click on the plus icon that appears to the right of the student's name.
This area will show a summary of the student's attendance as well as all the grades for assignments that have been assigned.

Next Steps
- See also: How to Create Assignment Plans