This article provides instructions on how to add, resize, and manage profile pictures for clients in BestNotes, along with recommendations for taking compliant photos.
Permissions Required
No specific BestNotes permissions are required.
Managing Client Profile Pictures
Recommendations for Taking Profile Pictures
Consider the following recommendations when taking profile pictures:
- BestNotes Mobile App (HIPAA Compliant)
- Hold horizontal (Landscape) only
- NOTE: Taking a vertical (Portrait) picture will be switched to horizontal in BestNotes and display incorrectly.
- Stand 2 Feet away or less from client
- Make sure it only saves to BestNotes and not device (HIPAA compliant)
- Hold horizontal (Landscape) only
- Regular Camera (See HIPAA-G02)
- Portrait (Vertical) requires resizing
- Horizontal (Landscape) requires resizing
- NOTE: Rule of Thirds (For more information, Click HERE)
- Place the client's left eye on the right vertical line
- Leave a little space above the head, not hairline
- See driver licenses or passport photos for reference
Resizing Profile Pictures
Profile pictures must be under the 500kb limit. If a picture is too large or displays incorrectly on reports or the client portal, you may need to resize it. Use Windows Paint or Mac Preview to resize pictures.
Windows: Paint
- Click on the Resize button.
- Click on the Pixels button.
- Either the Horizontal or the Vertical box will have a bigger number.
- Make sure Maintain Aspect Ratio is checked.
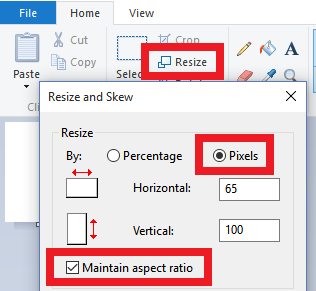
- Change the box with the higher number to 100.
- This will change the other box to fit within that size.
- Click OK.
- Once completed, Save As a new file with a new file name (e.g., add a 2 at the end of the name, but before the .jpg extension).
Mac: Preview
Select the Adjust Size icon or the Tools drop-down menu.


Change to Pixels view.

Either the Width or the Height box will have a bigger number (depending on how the picture was taken, e.g., Landscape vs Portrait).
- Make sure Scale proportionally and Resample image are checked.
- Change the box with the higher number to 100.
- This will change the other box to fit within that size.
- Click OK.
- Once completed, Save As this new size as a new file with a new file name (e.g., add a 2 at the end of the name, but before the .jpg extension).
If this was to fix an oversized picture, re-upload the picture and check it on the document.
Adding a Profile Picture
To add a picture to a client's profile (Face) page:
- Click on the Edit Photo button.
- Read the *NOTE (Resize) before clicking Browse (see Resizing Profile Pictures section above).

- Navigate to and select the picture.
- Click Open.
- Follow HIPAA Compliance on Storing or Removing pictures from your device (See HIPAA-G02).
Client Picture Roster Report
The Client Picture Roster report displays current clients, defined as those with a Start Date (DOA) and no End Date (DOD).
- It is a picture roster of all current clients.
- Clients are listed in alphabetical order by last name.
Replacing a Profile Picture
NOTE: A contact's profile picture / photo can only be replaced. BestNotes Support recommends having a generic picture available that your company has permission to use in this case.
Next Steps
- See also: Documentation on Reports